
I know what you are thinking about and I hope you’re not hungry. I am not going to talk about food, neither about cooking. In this post I will cover Chef, but not as a cook, but as an infrastructure automation tool. Cookbooks and recipes are not used just in the kitchen, but also in the world of cluster-cloud-technology. We won’t have anything to taste afterwards, but I do hope you’ll enjoy the reading.
Chef is translating infrastructure into code and uses Ruby as programming language. With other words, it is an automation tool used for infrastructure configuration, deploying and management across your network.
In this blog post I will cover the following Chef concepts:
- Chef architecture: High level overview about the core components of Chef and how they interact with each other.
- Chef Workstations: What they are, how to manage them using tools like chef-repo and knife, and we will explore the magic world of cookbooks, roles, data bags and environments.
- Chef Server: The main component in the architecture.
- Nodes: Definition, the role and how to access and configure them using chef-client and run lists.
- Chef Supermarket: An open source website containing various utils cookbooks.
- Chef Browser: The open source equivalent of Chef Manage – introduction, set-up instructions and how to access it.
Chef architecture
Chef has 3 main components:
Chef Workstation(s) can be a personal computer or a virtual machine where users interact with Chef. More precisely, it is the location where the users are writing the code and where the repository is created.
Chef Server, as the core of Chef, stores and provides data.
Chef Client nodes are the machines managed by Chef. Chef Client is installed on each node and is used to configure it with the desired configuration from Chef Server.
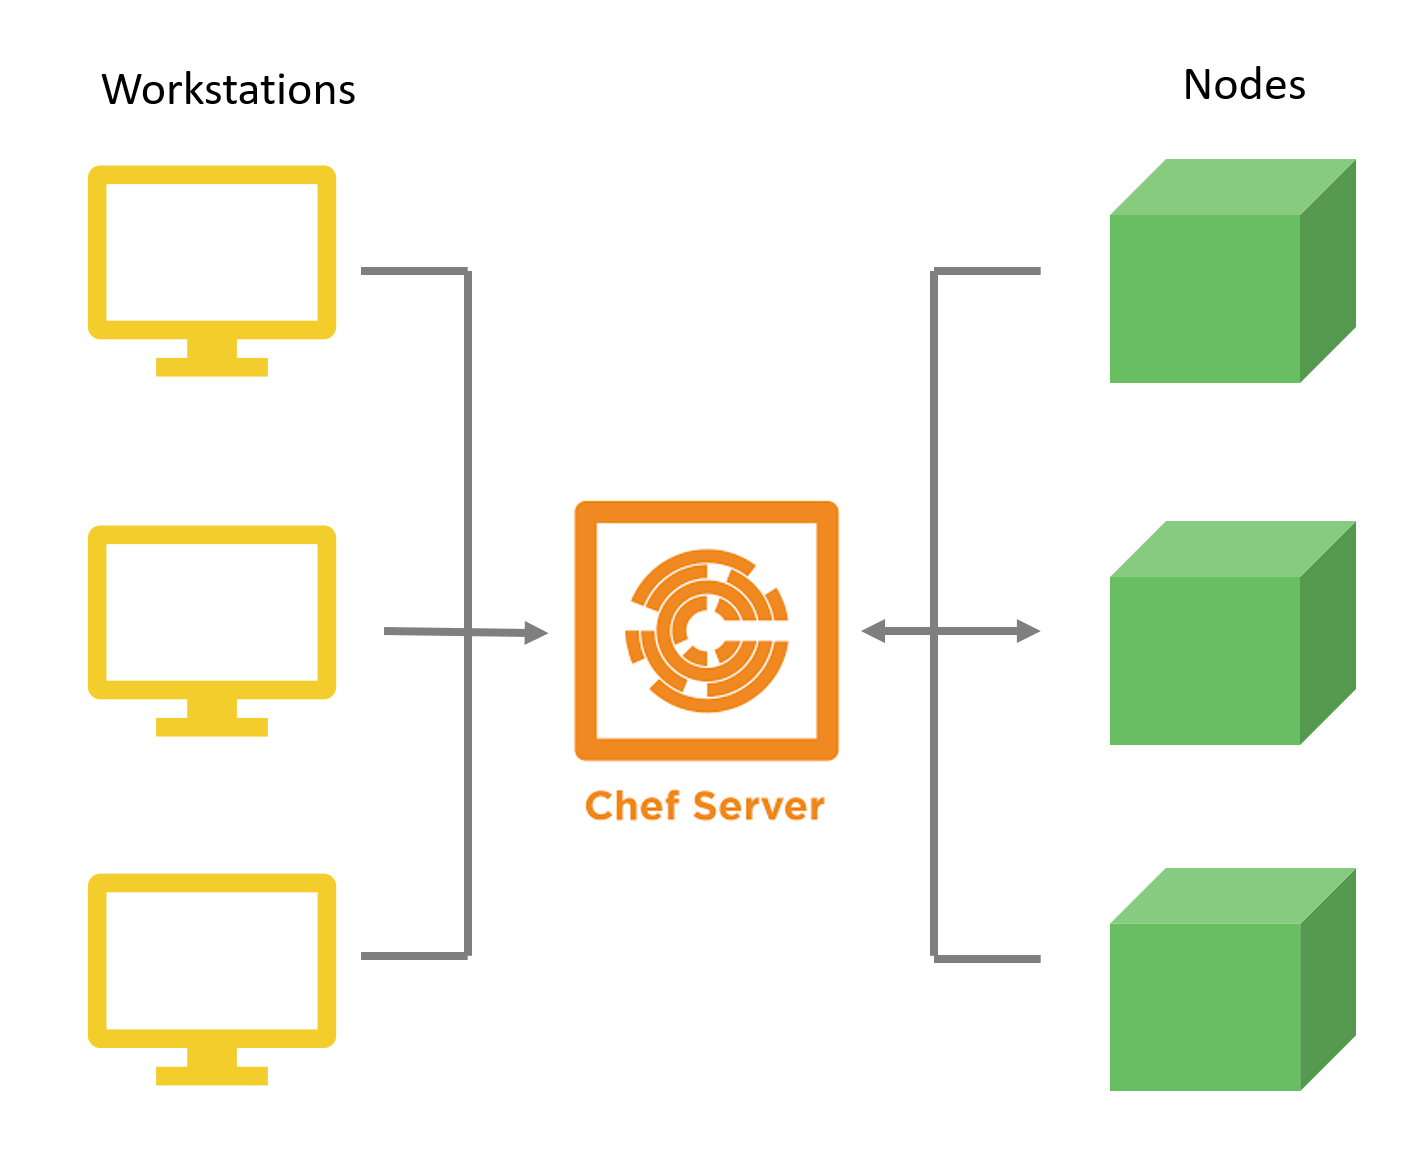
How does it really work?
As you can see in the picture above, from workstations to the Chef Server is only one way communication, but from Chef Server to nodes is both ways communication.
What does it mean?
The changes made on workstations are pushed to the Chef server and then pulled from Chef server to the nodes and implemented on each one through Chef client. After that, the information about the nodes is sent to the server in order to check which files are different from the current configuration and need to be overwritten.
Chef Workstation(s)
Workstations are the place where users are creating all the code that will be pushed to Chef Server and pulled after by the nodes.
Workstations can be a personal computer or a virtual machine that has Chef Workstation package installed. This package provides everything you need to get started, such as chef and knife command line tools or InSpec that allows you to write automated testes for your cookbooks.
There can be as many workstations as needed.
chef-repo is structured as a directory on the Workstations that stores the cookbooks, roles, data bags and environments. It should be synchronized with a version control system in order to allow multiple users to work on the same cookbook.
knife command tool is the communication way between workstations and server. It uploads the chef-repo directory on the server. It also helps to manage all the information about cookbooks.
Knife can be configured in knife.rb:
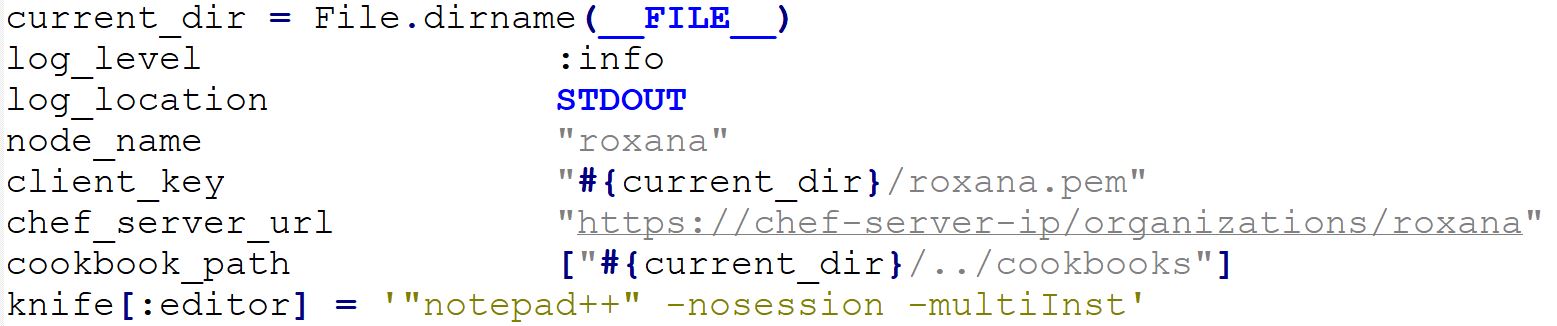
where:
- current_dir: current directory
- log_level: sets the default value for logs entries. Possible values are
:debug,:info,:warn,:errorand:fatal - log_location: sets the default value for log location. Possible values are
/path/to/log_location,STDOUT,STDERR,:win_evtand:syslog - node_name: the name of the node. This is typically also the same name as the computer from which knife is ran
- client_key: the location of the file which contains the client key. Default value: /etc/chef/client.pem
- chef_server_url: the URL for the Chef server
- cookbook_path: the sub-directory for cookbooks on the chef-client. This value can be a string or an array of file system locations, processed in the specified order. The last cookbook is considered to override local modifications
- knife[:editor]: the $EDITOR that is used for all interactive commands
A list with all the configuration parameters available can be found in the knife.rb’s documentation.
A knife command has the following format and is executed from the workstation:
knife subcommand [ARGUMENT] (options)For example you can execute knife command for the following:
- to edit, save and upload the node attributes:
knife node edit [NODE_NAME] -a- to search for nodes with a failed run state:
knife search node 'run_status_success:false'- to show the error log:
knife node show [NODE_NAME] --attribute [ATTRIBUTE_NAME_FOR_LOGS]For all available commands, check Chef’s knife documentation.
For more information about Chef Workstations’s tools, check Chef’s official documentation.
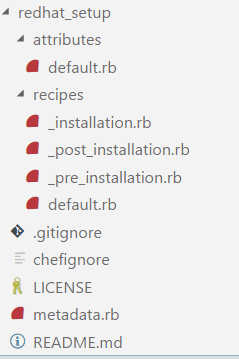
Cookbooks
Cookbooks are the main part of a node configuration. They contain all the information that a node requires to achieve the desired state.
Cookbooks should be version controlled. It helps when multiple team members are working on the same cookbook or if using different Chef environments it’s needed.
Most used components of a cookbook are:
- attributes
- recipes
- libraries
- templates
- metadata
Attributes:
Attributes are used to set values for different parameters on a node that can be overwritten or used after in the recipes.
Recipes:
The main component of a cookbook are the recipes. They are files written in Ruby that gives the desired values and checks to a node. A recipe can be included in another recipe(s).
Libraries
Libraries store ruby files that serve as helpers for the recipes.
A library file is stored under /libraries folder in the cookbook.
Templates
Templates are .erb files, written in Embedded Ruby and are used to generate static text files. These files serve as configuration files.
A template file is stored under /templates folder in the cookbook.
Metadata
Metadata file which is also a ruby file is required by any cookbook. This file provides information needed by Chef Server and Chef Client in order to deploy the cookbooks on each node.
Roles
Roles help on grouping nodes. A role consists of a run-list and attributes (or zero). A node can have zero or more roles assigned to it.
Data Bags
Data bags store global variables as JSON data. They can be created manually or using knife.
Environments
Are a way to organize nodes into different “groups”. For example, when testing a new cookbook, you’ll want to test on a “development” set of nodes before going to production.
Environments are defined in chef-repo/environments and saved as Ruby or JSON files.
Chef Server
Chef Server is the main component for configuration data and is the only communication way between workstations and nodes. Here are stored the cookbooks, policies and metadata needed for each node.
Nodes
Nodes are the virtual machines, containers, network devices or storage devices managed by Chef server. Each node should have Chef client installed in order to allow communication between nodes and server.
Nodes are validated through client.pem certificate and should be available over SSH as root or another user with root privileges.
Nodes are updated using chef-client command which runs a convergence between the node and the Chef server.
Chef-client
Chef Infra Client runs locally on every node and performs all the steps to bring the node in the expected state. chef-client command is run to update the nodes with the latest version of code from Chef server.
Run lists
Run lists are ordered lists of roles and/or recipes that contain all the information required for Chef to configure a node with the desired state. Run lists are stored as part of the node object on the Chef server and they are specific to that node.
Chef Supermarket
Chef Supermarket is the website that stores opensource cookbooks. They are accessible by any Chef user. All users can contribute to the Supermarket and upload their own work.
In order to check all the available cookbooks, visit Chef Supermarket.
Chef Browser
Chef Browser (developed by Three of coins) is the opensource version of Chef Manage, which means that is free. Being free, it has also a disadvantage: you can only see all the information, but not edit it. So in order to edit any information about cookbooks and nodes, you still have to use knife.
But I still think that is a great solution in you want to browse the data in your Chef server and you want to replace knife search and knife show that you are using a lot for sure.
Being released in 2013, it takes a bit of time to make it run in the nowadays Chef server.
I want to share with you, the steps that I needed to do in order to make it run:
- Chef browser files
- Clone the repo on the Chef server
- Create a new user for chef-browser installation and add root rights to it:
useradd chefbrowser;
passwd chefbrowser
- RVM installation
- Install RVM (Ruby Version Manager)
mkdir chef-browser/rvm-installation cd rvm-installation curl -sSL https://github.com/rvm/rvm/tarball/stable -o rvm-stable.tar.gz mkdir rvm && cd rvm tar --strip-components=1 -xzf ../rvm-stable.tar.gz ./install --auto-dotfiles source /home/chef-browser/.rvm/scripts/rvm browser/.rvm/scripts/rvm - Install Ruby (using RVM)
Move Ruby packages to RVM archive folder:cd .. cp -r ruby-* /home/chef-browser/.rvm/archives/ ll /usr/local/rvm/archives/Install dependencies:
rvm autolibs read-fail
rvm requirements
cd ../rpm-packages
sudo yum install *.rpm
Install Ruby:
rvm install 2.0.0p648
rvm install 2.2.0
rvm install 2.5.0
rvm --default use 2.0.0 #change the Ruby version
rvm list # see the Ruby version installed
rvm use 2.2.0 # change the Ruby version only for the opened terminal
- Install RVM (Ruby Version Manager)
- Chef browser installation
Install bundlercd ../gem-packages/ gem install bundler-2.0.2.gem gem install pumaInstall gems
bundle install --local
# or
gem install *.gem
Create Chef user and add it to the organization
sudo chef-server-ctl user-create chef-browser CHEF BROWSER chefbrowser@*****.** '*****' -f features/fixtures/chefbrowser.pem
sudo chef-server-ctl org-user-add [org name] chef-browser
sudo chef-server-ctl user-show chef-browser -l
Edit settings.rb
cd chef-browser
vim settings.rb
# add server url, client name, client key
server_url "http:///organizations/[org name]"
client_name "chef-browser"
client_key ::File.join(::File.dirname(__FILE__), 'features/fixtures/chefbrowser.pem')
# set ssl connection to false
connection[:ssl] = { verify: false }
# set a title for the Chef browser
title "Chef Browser"
Run chef-browser as a service
sudo cp chef-browser/service/puma.service /etc/systemd/system/
cd /etc/sysrend/system/
sudo systemctl daemon-reload
sudo systemctl enable puma.service
sudo systemctl start puma.service
sudo systemctl status puma.service

# Check if the service is started by chef-browser user
ps aux | grep browser
# puma - e production
# run in background
# nohup puma -e production &
Change the DefaultTCPHost in puma configuration
vim /usr/local/rvm/gems/ruby-2.5.0/gems/puma-3.11.4/lib/puma/configuration.rb DefaultTCPHost = "127.0.0.1" systemctl restart puma.service systemctl restart nginx - Check if the installation was successfully on:
http://<chef_server_ip>:9292
Conclusion
In this post we’ve looked at the Chef architecture, basic tooling, config set-up and an opensource free alternative for Chef Manage.
I decided to write this post to share my experience with you, to give an overview of the infrastructure management solution space and to help you save time in installing and configuring Chef Browser.
I really enjoyed working with Chef, it’s a great tool for automated infrastructure flow, it’s well documented and it offers a great variety of free tooling usage.
Further information can be found on Chef’s official documentation.
